DejaOffice PC CRM Migration Guide
The following guide will go over how to migrate your legacy data into DejaOffice PC CRM
This guide assumes that the desired data is on your PC and is accessible using your legacy database app. This guide assumes you have DejaOffice PC installed, registered and otherwise ready to use, if not there are links below to help you with that process.
DPC can Migrate from the following Databases:
DejaOffice PC CRM Install and Setup Wizard
First, install DejaOffice PC CRM:
- Click Here to find the latest DejaOffice PC CRM to download.
- When the download is complete, run the setup and follow the prompts to install.
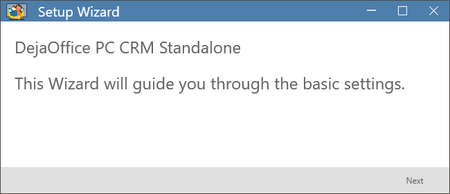
After installing the DejaOffice PC CRM you be promoted with a Setup Wizard. This will help guide you through first time setup. Click Next on the first screen to get started.

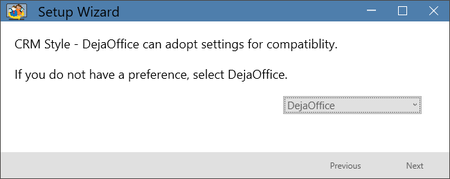
DejaOffice PC CRM Style
Selecting your CRM Style. CRM style enables certain settings in DejaOffice PC CRM that should help it look close to the Database Style Selected.
If you are unsure which style to select, leave it on DejaOffice CRM Style.

Data Source Migration Settings
On a first time Migration, check the following settings to ensure you are fully Migrated.
1. Calendar tab:
In the Calendar Tab, if you would like to sync all past calendar events from the source database (ie Outlook, Act, etc) you can set the Date Range to "99999". This is optional and can increase sync times if this setting is left turned up.
2. Note Options (Act! and GoldMine):
In the Notes Tab (GoldMine) or the Note/History Options Tab (Act!). You can change the Maximum Number of Notes to Transfer to "999" if you would like to ensure every past Contact Note is migrated from the Source Database. This is optional and similarly to the date range setting this may increase sync times.
3. History (Act! and GoldMine):
In the Applications tab and ensure the History option is checked. If so, find the Notes Tab (GoldMine) or the Note\History Options Tab (Act!). You can change the Maximum Number of Histories per Contact to "999" if you would like to ensure every past Contact History is migrated from the Source Database. This is optional and may increase sync times.
4. Secondary\Additional Contacts (Act! and GoldMine):
If you want to sync Secondary Contacts (Act!) or Additional Contacts (GoldMine), find the Additional Contacts Tab (GoldMine) or the Secondary Tab (Act!). Enable the option to "Sync Additional Contacts" (GoldMine) or Disable the option to "Sync Secondary Contacts" (Act!). You can also enable syncing of Company records from Act if you wish, note these are records in the Company area in Act and does not apply to contacts that happen to have data in their company field.
5. Custom Fields (Act! and GoldMine):
If your Source Database is Act! or GoldMine, and you have Custom Fields in your Database, those can be synced to DejaOffice PC CRM. DejaOffice PC CRM Standalone allows for 9 custom mappable fields, DejaOffice PC CRM Express and Professional allow for 20 custom mappable fields. Please note the standard fields (Name, Address, Phone numbers, will be pre-mapped). To check for Custom Field mapping, find the Field Mapping Tab and select it. Give it a moment to load and select the top drop down and change this to "Custom Fields 1-10" or "Custom Fields 11-20". These fields can be set to your own user fields in Act! or GoldMine. The Custom Field Labels will appear in DPC after the sync as well. For Act! Custom Field 1-9 default the Act! User fields Tab for User 1-9.
6. Category Field Tab (Act!):
DejaOffice PC CRM uses Categories in place of ID\Status in Act!. By default ID\Status syncs to the DPC Categories. If you want to change this, select the Category Field tab and change the drop down. If you use "Groups" to filter records in Act! you can set this "Group Name". We don't recommend setting this to any fields other than "ID/Status" or "Group Name".
6. Activity Mapping Tab (Act!):
By default Act Todos are sent to the DejaOffice PC task list, if you would rather them synced to the calendar, you can change that here.
Migrating from DejaCloud
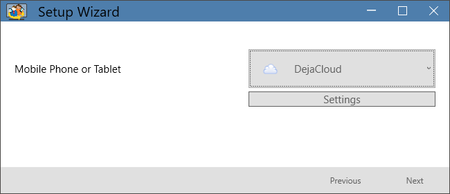
If your data is already in DejaCloud and there is no other PC Database, skip the "PC Data Source" option in the Setup Wizard, and under the Mobile Phone\Tablet option select DejaCloud. Choose Settings under DejaCloud and enter your Email and Password.
1. Date Range: In the Calendar Tab, you can set the Date Range to "99999" if you would like to ensure every past calendar entry is synced.
2. History: In the Applications tab and ensure the History option is checked if you would like to sync histories.

Mobile Phone or Tablet Sync
If you are migrating from a current database, leave the Mobile Phone or Tablet sync option set to None for the time being. Click Next to Complete the Setup Wizard and choose "Yes" to Sync Now when Prompted. Let the initial Migration sync complete, then check your data in DejaOffice PC CRM. You should now have a full set of data from the Source.
After you have verified the database has migrated into DejaOffice PC CRM, if you no longer need a sync with the original Data Source, you can set the Sync for the "Source" back to None, in the DejaOffice PC CRM Settings > Sync Settings.
Last modified: Apr 22, 2025 8:16 am